
前言
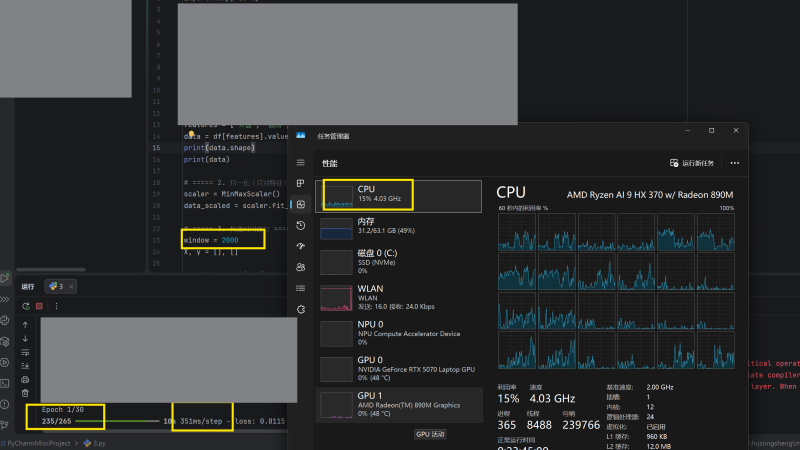
在我运行LSTM模型的时候当我把时间窗口调到很大的时候我发现运行速度特别慢而且CPU的占用很低,原因在于 GIL(Global Interpreter Lock,全局解释器锁)简单来说python在同一时刻只有一个线程运行,而且就算采用了多线程也不等于多核并行,让我们看看Python核心开发者【码农高天】是怎么解释它的:【python】天使还是魔鬼?GIL的前世今生。一期视频全面了解GIL!。这个问题困扰了我两天终于解决了
![图片[1]-Conda虚拟环境如何安装 TensorFlow GPU加速-胡宗胜的个人博客👤](https://huzongsheng.cn/wp-content/uploads/2026/01/image-13-1024x575.png)
重新安装
下面请让我重新开一台机器,从头开始安装。尽量按照官方文档,为什么使用GPU加速神经网络运行?GPU内部通常有上千或更多CUDA的核心。CUDA核心更加的专能,处理矩阵运算等效率更高。这里 RTX 5070 Laptop 和 Quadro P 620 GPU-Z信息图片为例
进入 TensorFlow 英文官网,注意一定是英文官网,因为中文官网的更新通常更慢,这在例如联想等很多的技术官网中也是一样。经过一番查找,我们发现并不仅仅是安装 TensorFlow 的 GPU 版本就可以一劳永逸的。我们还需要安装以下依赖。
- NVIDIA CUDA Toolkit
- cuDNN
![图片[2]-Conda虚拟环境如何安装 TensorFlow GPU加速-胡宗胜的个人博客👤](https://huzongsheng.cn/wp-content/uploads/2026/01/image-16-1024x598.png)
要注意的是我们发现 TensorFlow-GPU版本,是绑定上述两个依赖的版本,并不是都安装最新的就可以了。下面我以安装 TensorFlow-GPU 2.10.0 版本为例
创建对应 Python 版本的虚拟环境
由上图所示,Python版本为 3.7-3.10 我们就创建 3.10 的 Python 虚拟环境吧
首先我们简单介绍一下 conda 的命令行教程
conda 是一种管理和部署应用程序、环境和软件包的工具。
我比较讨厌用列举的形式去写文档,而是通过情景
commands:
  The following built-in and plugins subcommands are available.

  COMMAND
    activate            Activate a conda environment.
    clean               Remove unused packages and caches.
    commands            List all available conda subcommands (including those from plugins). Generally only used by tab-completion.
    compare             Compare packages between conda environments.
    config              Modify configuration values in .condarc.
    content-trust       Signing and verification tools for Conda
    create              Create a new conda environment from a list of specified packages.
    deactivate          Deactivate the current active conda environment.
    doctor              Display a health report for your environment.
    export              Export a given environment
    info                Display information about current conda install.
    init                Initialize conda for shell interaction.
    install             Install a list of packages into a specified conda environment.
    list                List installed packages in a conda environment.
    notices             Retrieve latest channel notifications.
    package             Create low-level conda packages. (EXPERIMENTAL)
    remove (uninstall)  Remove a list of packages from a specified conda environment.
    rename              Rename an existing environment.
    repoquery           Advanced search for repodata.
    run                 Run an executable in a conda environment.
    search              Search for packages and display associated information using the MatchSpec format.
    update (upgrade)    Update conda packages to the latest compatible version.
这里创建一个指定版本的虚拟环境
conda create -n test python==3.10![图片[3]-Conda虚拟环境如何安装 TensorFlow GPU加速-胡宗胜的个人博客👤](https://huzongsheng.cn/wp-content/uploads/2026/01/image-18-635x1024.png)
中间会列出要安装的 Python 依赖包,为了继续安装,选择 yes 即可,下图为正在安装过程
![图片[4]-Conda虚拟环境如何安装 TensorFlow GPU加速-胡宗胜的个人博客👤](https://huzongsheng.cn/wp-content/uploads/2026/01/image-19-1024x643.png)
安装完成后,我们要激活 (activate) 虚拟环境
![图片[5]-Conda虚拟环境如何安装 TensorFlow GPU加速-胡宗胜的个人博客👤](https://huzongsheng.cn/wp-content/uploads/2026/01/image-20-1024x897.png)
conda activate test
安装 NVIDIA CUDA Toolkit
这里我想安装 TensorFlow-GPU 的2.10.0 版本 经查阅,我们需要安装 CUDA Toolkit 11.2 版本
![图片[6]-Conda虚拟环境如何安装 TensorFlow GPU加速-胡宗胜的个人博客👤](https://huzongsheng.cn/wp-content/uploads/2026/01/image-15-1024x598.png)
在 conda 社区中搜索 cudatoolkit,要注意的是在 pkgs/main 中可能并没有你想要的版本,因此,我们要把搜索范围扩大到社区
conda search cudatoolkit -c conda-forge![图片[7]-Conda虚拟环境如何安装 TensorFlow GPU加速-胡宗胜的个人博客👤](https://huzongsheng.cn/wp-content/uploads/2026/01/image-21-1024x700.png)
下面是安装代码
conda install cudatoolkit==11.2.0 -c conda-forge下图中所展示的是安装过程中新安装一些包而有些包会被升级,并且 CUDA工具包 可能多达1G
![图片[8]-Conda虚拟环境如何安装 TensorFlow GPU加速-胡宗胜的个人博客👤](https://huzongsheng.cn/wp-content/uploads/2026/01/image-22-1024x643.png)
安装 cuDNN
![图片[9]-Conda虚拟环境如何安装 TensorFlow GPU加速-胡宗胜的个人博客👤](https://huzongsheng.cn/wp-content/uploads/2026/01/image-17-1024x598.png)
安装 cuDNN 方法和安装 cudatoolkit 一样
conda search cudnn -c conda-forge
conda install cudnn==8.1.0.77 -c conda-forge
安装 TensorFlow-GPU
这离我们在 pkgs/main 中安装
pip install tensorflow-gpu==2.10.0验证与使用
输入 conda list 列出 conda 环境中已安装的软件包及其版本。检查是否有上述的软件包,并且确认版本号
conda list ![图片[10]-Conda虚拟环境如何安装 TensorFlow GPU加速-胡宗胜的个人博客👤](https://huzongsheng.cn/wp-content/uploads/2026/01/image-24-1024x902.png)
![图片[11]-Conda虚拟环境如何安装 TensorFlow GPU加速-胡宗胜的个人博客👤](https://huzongsheng.cn/wp-content/uploads/2026/01/image-25-1024x542.png)
在 PyCharm 中添加我们刚刚创建的虚拟环境
![图片[12]-Conda虚拟环境如何安装 TensorFlow GPU加速-胡宗胜的个人博客👤](https://huzongsheng.cn/wp-content/uploads/2026/01/image-23-1024x582.png)
后记
再查阅了英文官网之后,我们发现好像在windows系统上有了更好的安装方法,那就是在 WSL2 中构建/安装 TensorFlow


暂无评论内容